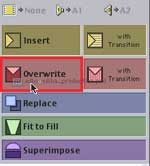
DRAGGING INTO THE CANVAS
Like everything in Final Cut, there are multiple ways to do Overwrite and Insert editing.
Instead of using the red and yellow colored buttons, you can do the same thing by DRAGGING the clip from the VIEWER window over INTO the CANVAS. When you drag them over, you’ll see an edit overlay appear with a series of editing options.

Drop your clip into whichever portion of the window indicates the function you’d like to utilize. Again there are a number of additional options here we won’t be covering in class. Feel free to play with them or read the Final Cut Pro manual if you’d like.
One difference between editing in these two ways versus simply dragging your clips down to the timeline last week, is how you determine the destination VIDEO and AUDIO tracks. In other words, how you determine upon which tracks the Video and Audio will land.
When you dragged your footage down from the VIEWER window directly into the TIMELINE, you could either place the video in the V1 or the V2 tracks or even create new additional Video Tracks by dragging the clip to the area above the current tracks.
And if you chose V1, then the audio would automatically go to A1 and A2 (if it was in stereo) and choosing V2 would automatically put the Audio is A3 and A4
When using the “insert” and “overwrite” buttons OR when dragging video from the VIEWER window to the CANVAS window, the track destination will be determined by the SOURCE CONTROLS in the TRACK CONTROLS area